
NetSetMan
Help File
![]() English
English
![]() English
English
A translation of the latest help file in your language is currently not available!
Please use this English version instead for now.
The translated old v2.x help file is available online.
You can view it to understand the basic functionality. But be careful: a lot of features are new or have changed.
| Help File Version | 3.0 |
| Last Modified | 2010-01-05 |
|
Supported Operating Systems |
Windows 2000, XP, 2003, Vista, 2008, 7 32 bit, 64 bit |
| License |
Non-Commercial Freeware or Commercial Pro Version |
| Contact |
www.netsetman.com Support Forum |


NetSetMan is a network settings manager which can easily switch between 6 different, visually structured profiles including:
|
Additionally only in the Pro version:
|
NetSetMan offers you what have been missing in
Windows until now:
A powerful, easy-to-use interface to manage all your network settings
at a glance.
Give it a try and you'll never want to be without it again.
All settings and changes are saved automatically in a separate file (settings.ini) so a backup, transfer or upgrade to another version is absolutely no problem.
With one clicks you can activate a saved profile!

The tabs symbolize the available profiles. You can save 6 different sets of settings in those tabs.
If you'd like to change the settings of two different network adapters when activating a single profile, you can use the MultiProfile feature. Click the "+"-button besides the dropdown list and a new menu bar will appear containing two MultiProfiles (the current one and a new, empty one). The caption will be automatically the name of the network adapter that is selected in that MultiProfile and can't be changed. You can create as many MultiProfiles as you like. All of them will be activated one after another when the profile is activated. You can rearange the order by drag-and-drop.
All changes are saved automatically so nothing gets lost accidentally.
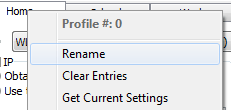
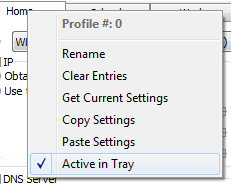
You can rename a profile by right-clicking it and choosing "Rename" or simply double-clicking it.

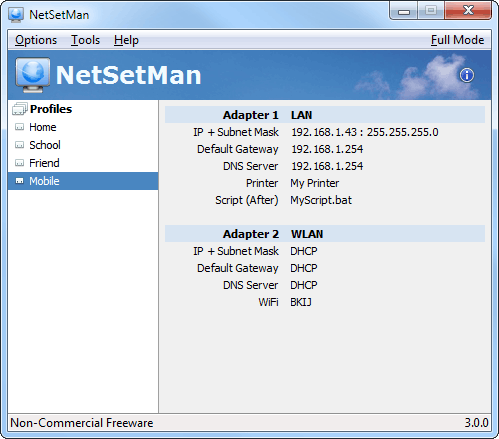
All available network adapters are displayed as their name and their type.
To manage one of those NICs you have to load all available connection names into the dropdown list by clicking "Refresh" and finally choosing a network adapter.
If you copy the settings file (settings.ini) to another computer, NetSetMan will try to re-assign NICs in the profiles automatically. However this will only work, if the new system has a NIC with exactly the same name (in the screenshot it's "LAN").
If no NIC with the same name can be found then it will be listed as "[?]". You'll then have to refresh the available NIC list again.
If a NIC that you need is not included in the list (because it is deactivated, virtual, ...) you can use the Advanced Refresh feature (click the arrow besides "Refresh" to acces it). There you'll find a complete list of all available NICs. Check all NICs that you want to have in your list.
Note: All NICs that are included in that list will appear in the TrayInfo.

To load a current setting from the chosen profile just click on the
 symbol besides the entry field.
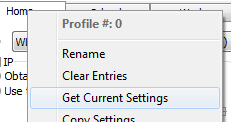
To get all current settings (that have the mentioned symbol)
right-click the profile and choose "Get Current Settings".

If you want to clear a certain entry field you can do this easily by
double-clicking its caption.
To clear all settings of the current tab you have to right-click the
profile and choose "Clear Entries".


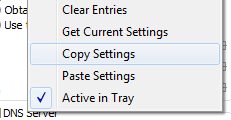
If you want to transfer settings between different profiles you can copy and paste a whole profile by right-clicking the first profile, choosing "Copy Settings", then right-clicking the second profile and choosing "Paste Settings".
A special paste-feature is available for the IP, DNS and WINs groups. By clicking the star-icon only that group will be filled with the copied settings.
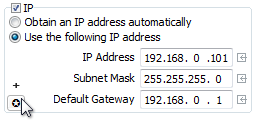
You can specify more than one IP, Gateway, DNS and WINS address if you need to be in several networks at the same time. To do so click the "+" symbol in one of the IP groups. In the "Additional Addresses" windows you can set up an unlimited amount of addresses. Enter your values in the entry fields at the top and click the [ v ] button to add the address to the list.
You can rearange the order by drag-and-drop.
Delete an entry by highlighting it and clicking the red [ x ]
button.
Double-click an entry to fill its address value into the entry
fields.
Whereas clicking the symbol in the main window only reads the
first value, here it reads all assigned addresses.


A NetSetMan profile can be used to connect to an existing WiFi profile. To do this select a WiFi adapter in the NICs dropdown list, then select a WiFi profile from the WiFi dropdown list. If you only want to disconnect your WiFi connection, choose the empty entry.
Besides this basic WiFi switch NetSetMan offers an extensive WiFi management. Click the WiFi icon or use the main menu (Tools > NSM WiFi Management) to access it. You'll find a list of all currently available WiFi networks. A yellow background indicates that a profile with the same SSID already exists. A network with a green background is currently connected. You can connect to a network by double-clicking it or using the "Connect"-Button. If there's no existing profile for this connection you can choose to create it first. The settings (authentication, encryption, ...) will be pre-configured automatically depending on the recognized network. However, you might need to adjust them in case the recognition didn't work correctly for some reason.
NetSetMan works with the native Windows WiFi profiles. This means that you always have access to the same profiles that you already used in Windows or some other WiFi software. You can create, modify or delete WiFi profiles.
Requirements
NetSetMan uses the native WiFi API of Windows. That brings the big advantage that no new drivers need to be installed (which might result in several conflicts). On the downside the WiFi features of NetSetMan will only work on Windows systems that already support WiFi. The good thing is that most of the versions used nowadays do so. If you use Vista or later you're good to go. In XP you need to have SP2 or SP3 installed. Windows 2000 is not supported.
Make sure the service WLAN AutoConfig (Wlansvc) (Vista and later) or Wireless Zero Configuration (WZCSVC) (XP) is running.
If your WiFi adapter comes with a custom manufacturer software to
manage WiFi settings, then it'll block Windows access in most cases.
You'll need to find the option to switch to Windows management in
that software (if available).
Because there are many different manufacturers with their own
software, there's no universal way to achieve this. Here's one
example: If you're using an AVM FRITZ!WLAN USB device, click the tray
icon of its software and choose "Windows WLAN".


NetSetMan offers you a comfortable way to manage your script files. However, it has no own script language. This means you can only use script languages your OS is able to execute. Common script languages are VBS, JS and even simple DOS Batch files. Use your favorite search engine to find more information about scripting and what you can do with it.
Open an existing script file or create a new one to be able to edit
the script.
You can have two scripts that will be executed before and after all
other settings are changed.
If you need a delay between running the script and changing the
network settings, you can specify it at the bottom.

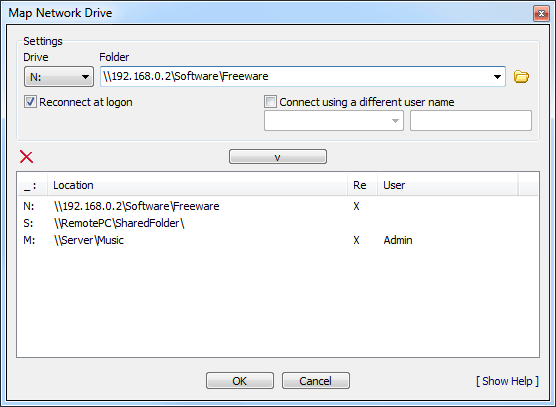
With NetSetMan you can map and unmap an unlimited amount of network
drives.
Please read the instruction notes at the bottom of the window by
clicking "[ Show Help ]".
When a profile is activated and the Net Drive feature is selected NetSetMan will compare the list of all currently mapped drives with the list of the drives to be mapped. All mapped drives that are in both lists (same drive letter and same location path) will remain untouched. All other network drives will be unmapped before the new ones are mapped.
To apply all settings of the current profile you have to click on
"Activate".
Notice that only settings with a checked checkbox will be activated.
A new window will pop up. It contains information about the current
activation state.
There you can see which settings are going to be applied and whether
the process is successful or not.
You can cancel the activation process by clicking the
"Cancel"-button. Settings below the current point won't be set then.
Notice that even if you get an "OK" as a result it might be a good idea to wait for a while so changes can be synchronized in the network (especially "PC Name" and "Workgroup/Domain"). In certain cases you will need to reboot your system.
If all results are green: good :-)
If not: Well, then you have to read the error message and try to
solve the problem.
Click on the "+" at the bottom of the window to get a detailed log.
To find solutions for the most common errors and problems have a look at the FAQ.


| Common results and their meanings | |
| OK | fine :-) |
| ... | Settings are currently being applied |
| - | Settings were ignored without trying, because they were incomplete or erroneous |
| Error | In most cases errors are shown as a red, short and clear text like "Wrong password" |
| Access denied | You probably don't have the required user rights to change this settings |
| invalid | Either a value is not valid, not specified or not allowed (special characters, same workgroup as computer name, etc.) |
| FF is active | Firefox is currently running. To apply FF settings you have to close Firefox |
| Error: 95/96 |
"Unable to notify DNS service." Please have a look at your Services dialog (type "services.msc" in the "run" window). Find "DNS-Client" and make sure it is set to "Automatically". Do the same for "DHCP-Client" |
| Error: XX | If you get an error with an error code and you absolutely have no idea what could be wrong please post the error code in the support forum. |
Besides the classic "Full Mode" interface, where you can change all settings of a profile, an additional interface "Compact Mode" is available. You can switch between those modes at any time by clicking the according button in the main menu on the right.
Once all profiles are set up the Compact Mode is the ideal interface. Here you have a compact overview of all settings of a profile without worrying about settings being modified accidentally.
In case you use the NSM Administration (with "Change profile settings" being unchecked) the Compact Mode will be used automatically to prevent the user from being able to change settings.
When NetSetMan is running you'll find its icon in the tray bar
(beside the clock).
There you can quickly activate a profile. Just right-click the icon
and choose the profile to activate.
If you'd like to exclude some profiles from appearing in the tray, you can hide them individually. To do this select the profile in the main window, right-click on the tab and click "Active in Tray". The small symbol besides the text shows whether this profile will be clickable in the tray. This option will also have effect on the profiles shown in Compact Mode.
If you rest your cursor over the NetSetMan icon in the tray the TrayInfo will appear. It contains the current IP information that is used by the system. Because that data is gathered in real time, you might experience a certain delay. To reduce that delay you should consider turning off additional information like public IP, MAC addresses, etc. in the Preferences.


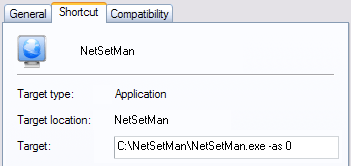
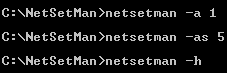
In some special cases you might want to change your profile without using the GUI of NetSetMan. (If you want to include it on a Boot-CD, add it to auto run, change profiles with shortcuts, etc.)
The following parameters are available:
-a # : Activates the profile with the number #
-as # : Activates the profile in silent mode
(Activating window will close automatically if no errors occured)
-h / -hide : Runs NetSetMan minimized
-f / -full : Runs NetSetMan in Full Mode
(default)
-c / -compact : Runs NetSetMan in Compact Mode
-m / -multi : Runs a second instance of NetSetMan.
Be careful: All active instances write to the same
settings file!
A shortcut for activating profile #0 in silent mode could look like
this:
C:\NetSetMan\netsetman.exe -as 0
In DOS (command line):
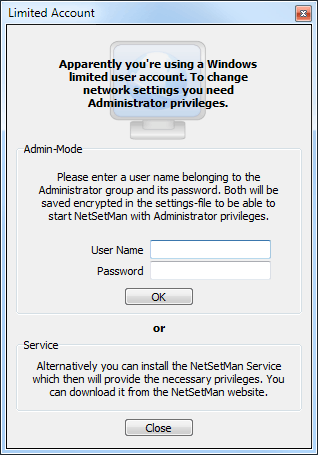
If you're working with a limited user account, NetSetMan usually won't work properly. However, you have the possibility to enter a user name and a password of an account with administrator privileges which will be saved encrypted in the settings file so NetSetMan can use them to start itself with the required privileges.
A second way is to use the NSM Service that is available free of charge at www.netsetman.com.
It is a special service that provides NetSetMan with the required
privileges. To install the service you will need administrator
privileges once. An uninstallation can be performed using the common
software uninstallation dialog of Windows. You can control the
service using the services dialog (services.msc) where you can stop
or restart it.
If you get the error "Invalid signature", make sure the program exe
hasn't been modified and the group policy "Turn off Automatic Root
Certificates Update" is deactivated.
Please read the extensive description about using NetSetMan with a limited user account in the FAQ.
If you set up NetSetMan for being used by somebody else, you might want to specify what actions the other person is allowed to perform. WIth the NSM Administration (Preferences > Administration) you can do exactly that. (Not to be mixed up with the "Admin-Mode".)
When you activate this mode you'll have to enter a password with 6 or more characters. Only with this password you'll be able to change NSM Administration settings or perform the actions that you chose to be secured (run NetSetMan, activate profiles, change profile settings, change program settings).
A checksum of your password will be written to the registry. Make sure a normal user has no write privileges for HKLM\Software\NetSetMan. If you forget your password, you will need to delete that key manually.
For the best security level you can choose to encrypt the settings
file. If it is not encrypted, it could be edited manually.
However, remember: Nothing is 100% secure. So even with the
encryption it is only a certain amount of additional security.

This message in the main window will appear at every 7th start of the program, on average. So this will be one time per week if you use it every day.
Unfortunately this is necessary to remind users that NetSetMan is only Freeware for non-commercial purposes. Saving paid time is always a commercial purpose that requires licensing NetSetMan Pro. Please read the license agreement for further information.
This message is not included in the Pro version, of course.

With NetSetMan Pro you are able to create an unlimited amount of profile categories. Each category contains 6 profiles.
In the profile categories bar at the top of the main window you can change the category you want to view and also edit categories (add, delete and rename).
The list icon at the right opens the profile categories editor where
you can organize your categories.
You can rearrange the order by drag-and-drop.
If you have more than one category, your profiles will be shown grouped in the tray menu.


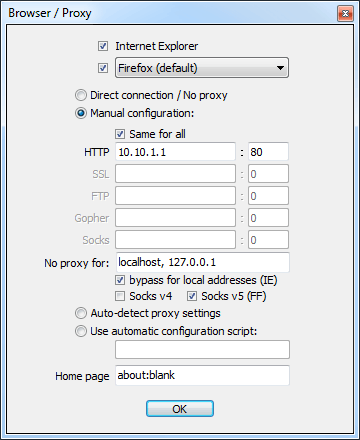
With NetSetMan Pro you can manage the proxy settings of Internet
Explorer and Firefox.
Because Firefox supports different profiles, every Firefox entry is
shown with its profile name in brackets.
The rest should be self-explaining, because it's quite similar to
your browser.
If you haven't entered any browser settings you will see "(...)" in the main windows otherwise the chosen browser (IE = Internet Explorer, FF = Firefox) and the HTTP-proxy will be visible on the main interface.
If you need to specify address blocks for "No proxy for..." in IE and FF, you'll need to enter both syntaxes (like "10.*.*.*, 10.0.0.0/8"). NetSetMan will filter invalid values for the browsers automatically.
Please notice that Firefox must be closed before applying new settings.
If the location of your Firefox profile folder changes (because of a new system etc.) you will need to re-select the profile in the list so it gets updated in your settings file.

To join a domain enter its name, your user name and your password. To enter your password click on the "P"-button. Now you can type in your password which will be saved encrypted in the ini-file. Neither you nor anybody else will be able to read it.
Usually it's enough to enter the pure user name.
If you get an error you can try entering one of the two following
standards as your user name:
1. NETBIOS: DOMAIN\user
2. UPN: user@domain.com
Ask your administrator if you are not sure.
Check the FAQ to read some notes about this feature.
